IDnameageaddresscitystateemail
Prerequisite
- Appropriate permissions:
datahub-admin,nx1_engineer,nx1_ingest,nx1_monitor,nx1_s3_admin, andnx1_quality
Create a domain on DataHub
A DataHub domain categorizes related ingested data. When categorizing related ingested data or discovering insights, NexusOne requires that you have an existing domain. Follow these steps to create a domain:- Log in to NexusOne.
- On the top navigation bar, hover the mouse over Govern and then click Data Catalog. This opens the DataHub app hosted on NexusOne in a new tab.
- If asked to log in, enter your NexusOne credentials or click log in with SSO.
- Navigate to the Domains tab in the far left, and then click Create.
-
Enter
quickstart_domainin the Name field. -
Click Create.
 A created domain on DataHub
 - Click the browser tab that has NexusOne to return to the NexusOne homepage.
Ingest a source and destination file
After creating the domain as previously described, ingest a source and destination file. The source file contains data in each row, while the destination file has no rows.- Source file
- Destination file
- On the NexusOne homepage, navigate to Ingest > File.
- In the File Details section, click Public File URL.
-
In the File URL field, enter the following URL to a CSV file:
-
In the Ingest Details section, add the following information in the fields:
- Name:
csv_quickstart_source - Schema:
csv_quickstart_schema_source - Table:
csv_quickstart_table_source - Schedule:
Every 3 hours - Mode:
append - Domain:
quickstart_domain - Tags: Don’t add any tags
- Name:
- Click Ingest. Wait for a few minutes until you see a success message appear.
-
Click View Jobs. Wait for a few minutes, you should see your job name,
csv_quickstart_source, in the list, and its current status. Ensure that the status is in aCompletedstate. If the status is ‘New’, then wait a little longer. - Return to the NexusOne homepage, and then click Discover to launch Superset.
- Click New and then SQL query.
-
Paste the following SQL command and then click the play icon to see the table from the source file.
It should show you a result similar to the following image. Rows 6 and 11 are duplicates.
 Table from the source file
Check data quality
After ingesting all files, follow these steps to check for data quality:- On the NexusOne homepage, click Quality.
-
Click Select catalogs, and then select the
icebergcheckbox. -
Select a schema and table.
- schema:
iceberg.csv_quickstart_schema_source - table:
iceberg.csv_quickstart_table_source
- schema:
-
In the Describe a rule in detail field, enter the following rule:
- Click Send. NexusOne generates one or more SQL commands.
- Pick one command, copy the SQL command, and then click Accept.
- On the NexusOne homepage, click Discover to launch Superset.
- Click New and then SQL query.
- Paste the SQL command and then click the play icon to execute the data quality rule. It should show you a result similar to the following image, indicating that duplicate rows exist.
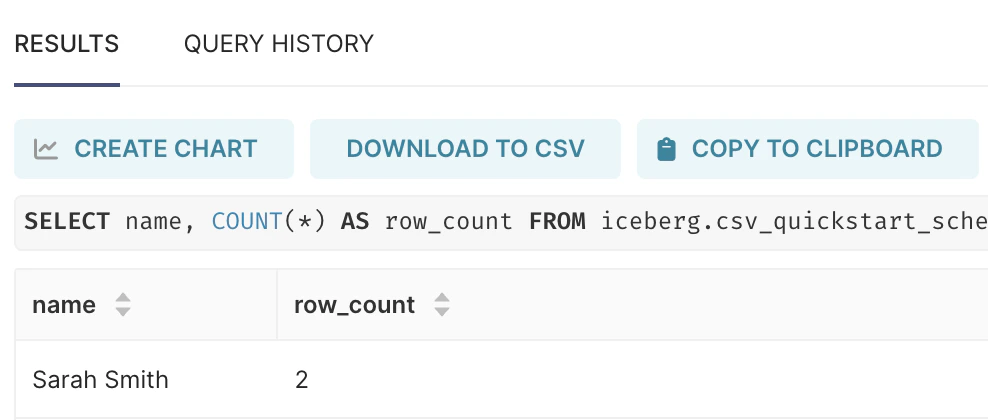
Result from a data quality check
Transform the data
Because multiple rows with the same name exist in the table, you can perform deduplication to remove the duplicate rows and send the transformed result into a new table.- On the NexusOne homepage, click Engineer.
- Click Lakehouse.
-
Select a schema and table.
- schema:
csv_quickstart_schema_source - table:
csv_quickstart_table_source
- schema:
- Click Next: Transform.
-
In the Job Name field, enter
transform_csv_quickstart. -
In the Transform Prompt field, enter the following rule:
- Select the Show preview? checkbox to preview the result from the executed generated query.
- Click Transform. NexusOne displays a data preview.
- Click Finalize to proceed to the next step.
-
Enter the following information in the fields:
- Destination Schema:
csv_quickstart_schema_destination - Destination Table:
csv_quickstart_table_destination - Domain:
quickstart_domain - Tags: Don’t select any tags.
- Schedule:
Every 3 hours - Mode:
append
- Destination Schema:
- Click Schedule. Apache runs on the first schedule, which means the data transformation job executes.
- Go back to the NexusOne homepage, click Discover to launch Superset.
- Click New and then SQL query.
-
Paste the following SQL command and then click the play icon to see the transformed result.
It should show you a result similar to the following image. Notice how only one record from the duplicate rows exist.
 Results from the transformed source table appearing in the destination table
Trace data lineage on DataHub
In NexusOne, the Iceberg catalog uses a Hive Metastore. You can see how the data flowed across your pipeline, using the following steps:- Navigate to the NexusOne homepage, click Connect.
- On the top navigation bar, hover the mouse over Connect and then click Hosted Apps.
- Click Global Data Catalog to lauch DataHub.
- In DataHub, enter
csv_quickstart_schema_destinationin the top search bar and then press theEnterorreturnkey in your keyboard to search for your transformed table. - Click Hive. This applies the filter,
Platform equals Hive. - Click the transformed table,
csv_quickstart_schema_destination.csv_quickstart_table_destination. - Click Lineage.
- When the diagrams load, click the left-arrow icon at the top left box to open the full lineage. You should see an image similar to the following:
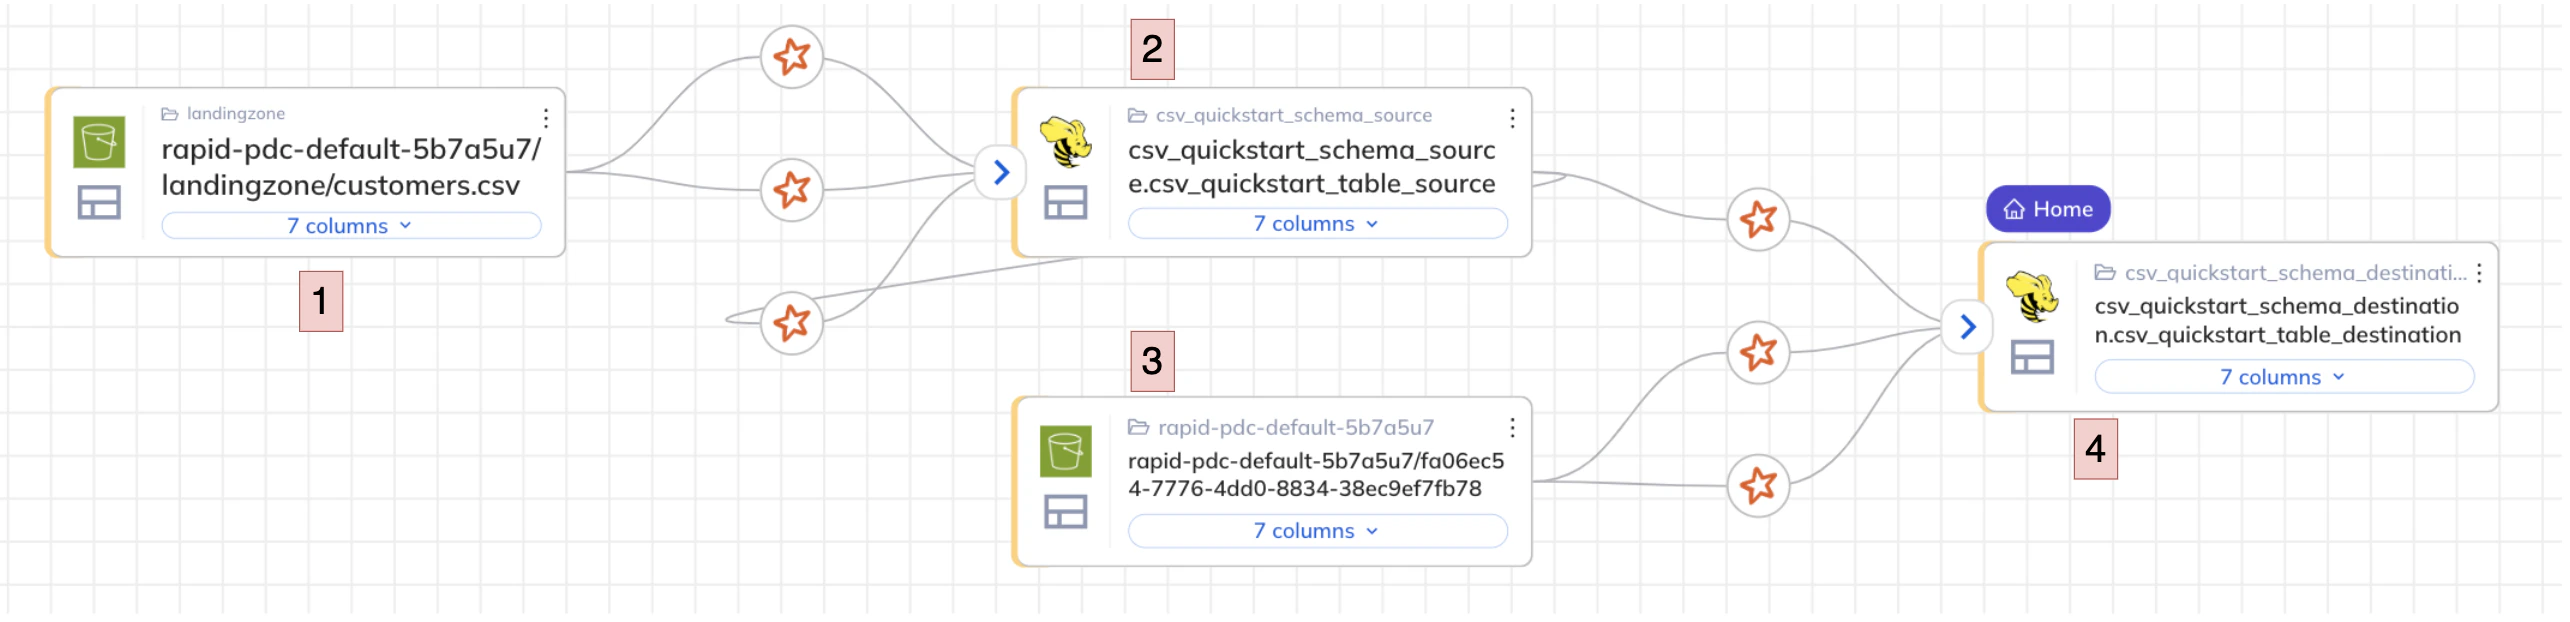
Data lineage of the transformed table
- From the left, you see an S3 source bucket storing the raw ingested CSV file.
- The metadata of the CSV file is available using a Hive Metastore, which uses an Iceberg table format.
- That table is then transformed and written back out to an S3 destination bucket.
- The metadata from the destination bucket is available using a Hive Metastore, which uses an Iceberg table format.
Clean up
You need to delete the previously scheduled jobs that are recurring, and also the new domain. Follow these steps to delete the jobs:- On the NexusOne homepage, click Monitor.
- For each job name,
csv_quickstart_sourceandcsv_quickstart_schema_destination, click the three dots...menu, and then click Delete job.
- On the top navigation bar, hover the mouse over Govern and then click Data Catalog. This opens the DataHub app hosted on NexusOne in a new tab.
- If asked to log in, enter your NexusOne credentials or click log in with SSO.
- Navigate to the Domains tab in the far left.
- On the domain name,
quickstart_domain, click the three dots...menu, and then select Delete. Confirm your slection by clicking Yes.