Jupyter Notebook general usage and features
Jupyter notebooks combine code, output, and documentation in a single document. They’re the primary way to work with Spark, Trino, and Python in JupyterHub.Create, rename, and organize a Jupyter Notebook
To create a Notebook, see Launching a Jupyter Notebook. Follow these steps to rename a Notebook file.- On the file browser, click the notebook name.
- Click File at the top right corner of the JupyterHub page, then click Rename Notebook.
- Enter a new name and then click Rename.
- Create folders for projects.
- Drag and drop notebooks between folders.
- Delete obsolete notebooks.
Writing and running code cells
A notebook contains cells. You use these cells for inserting Python, Spark, or Trino client code. To run a cell, press Shift + Enter or Shift + Return on your keyboard. Outputs such as DataFrames, logs, plots, and query results appear directly under the cell. Within a cell, you can freely mix:- Pure Python logic
- PySpark transformations
- Trino queries
- Utility imports from
utils
Markdown support for documentation
You can add Markdown cells to document your work. To do this, you can:- Change the cell type to Markdown using the toolbar or Esc + M on your keyboard.
- Use headings, bullet points, and code fences to explain:
- Purpose of the notebook
- Input datasets and assumptions
- Key checks and results
Save a Jupyter Notebook
Jupyter automatically saves your Notebook periodically, but you can also manually save it at any time. You can do this in either of the following ways:- Click File > Save Notebook at the top left corner of the page.
- Use the keyboard shortcut:
- Windows users: Ctrl + S
- macOS users: Command + S
Export a Jupyter Notebook
Jupyter Notebook exports Notebooks in multiple formats. To do this: Click File > Save and Export Notebook As at the top left corner of the page. You can export notebooks as the following file types:- Executable Script: Python file
- HTML: Static, view-only format
- LaTeX, ReStructuredText, AsciiDoc, Reveal.js Slides, other advanced formats
- Markdown: Raw markdown representation
- Notebook: Default editable format
- PDF: Printable format
.ipynb, format:
Click File > Download at the top left corner of the page.
Share a Jupyter Notebook
JupyterHub currently doesn’t support a built-in read-only notebook sharing within the platform. To share notebooks, you can do this in either of the following ways:- Export as a
.ipynband share via email or shared workspace. - Export as a
HTMLorPDFfor static, non-editable viewing.
Jupyter Notebook terminal
You can interact with the terminal to run PySpark, submit a Spark job, or manage a virtual environment.Launch the terminal
JupyterHub includes an integrated terminal that provides a Linux shell inside your Jupyter workspace. You can open it in either of the following ways:- From the Launcher tab, click Terminal.
- Click + on the left sidebar to open the Launcher tab, and then click Terminal.
- Inspecting files and directory structures
- Viewing log files and debugging output
- Running Python scripts
- Interacting with
pyspark, if available - Installing Python packages at the user level
- Managing virtual environments
- Moving, copying, and organizing notebook files
- Quick data exploration using shell tools
Check your Spark version
Before submitting jobs, you can verify the Spark distribution installed on the system by running:Submit a PySpark job with spark-submit
For long-running or heavy batch workloads, submit PySpark jobs to the cluster using
spark-submit rather than using an interactive Notebook.
With spark-submit available on your Spark client/edge node, a typical command looks
like the following:
spark-submit options with example usage:
-master <master-url>: Specifies the cluster manager to connect to. A few examples:-master yarn: Submits the job to the YARN cluster.-master local[2]: Runs Spark locally inside the Jupyter container using 2 CPU threads. Doesn’t use a cluster or YARN.
-deploy-mode <mode>: Specifies where to run the Spark driver. For example:-deploy-mode cluster: Runs the Spark driver inside the cluster. Recommended for production and long-running ETL jobs.
-name <app-name>: Sets a human-readable name for the app. For example:-name "DailySalesETL": Appears in Spark UI or the YARN UI if running on YARN.
--conf <key>=<value>: Sets a Spark configuration property for the job. For example:--conf spark.sql.shuffle.partitions=200: Configures shuffle partitions for Spark SQL.
/path/to/etl_job.py: The PySpark script that contains your ETL logic.-input <input-path>/-output <output-path>: Script arguments, typically pointing to raw and processed locations in object storage.
count_from_s3.py:

Sample output from a
spark-submit commandRun PySpark
If you installed PySpark in your environment, you can launch it directly in the terminal:run_spark_direct.py with the following code:

An output after running PySpark from the terminal
Install packages for your user
Use the Terminal in Jupyter to install packages for your user account. This makes them available to all notebooks you run, but doesn’t affect other users or system-wide packages. It’s recommended for environment-wide installations across all notebooks within the same user workspace. Open the Terminal icon in Jupyter and run:- This makes the package available to all notebooks in your workspace.
- Supports installing multiple dependencies at once using
requirements.txt.
- System-level Python
- Preinstalled libraries
- Platform-managed packages
Install an isolated package in the terminal
Users who need isolated dependencies can create a dedicated virtual environment inside their workspace. Follow these steps to install an isolated package.-
Create a virtual environment.
-
Activate the environment in the terminal.
-
Install packages inside the venv. For example, Pandas.
Using Jupyter Notebook UI
This section focuses on using Jupyter Notebooks to run PySpark and query Trino.Launch a Jupyter Notebook
You can use either the Launcher or file browser to launch a Jupyter Notebook. Steps when using the Launcher:- From the Launcher tab, click Python 3 under Notebook.
- A notebook opens in a new tab with an empty code cell. Enter something in the cell.
The Python 3 kernel is pre-configured with Spark and Trino client libraries.
Install an isolated package using Jupyter Notebook
Enter the following code in a new notebook cell and run it using Shift + Enter or Shift + Return on your keyboard.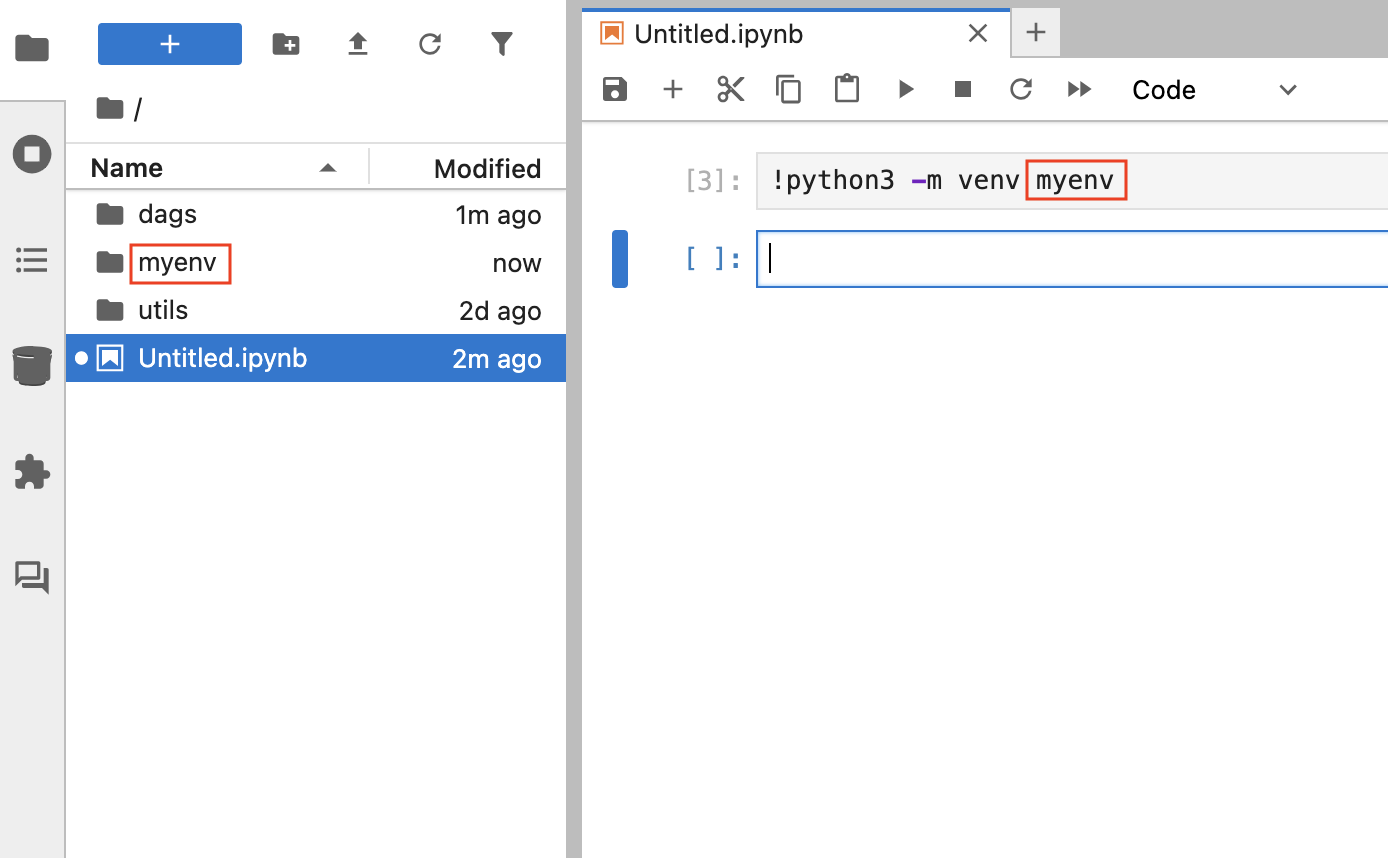
- Virtual environments are optional but recommended for complex dependencies.
- Package installations are persistent across notebook sessions.
- If a package installation fails, restarting the kernel usually resolves path issues.
- If two versions of a library conflict, use a virtual environment to isolate them.
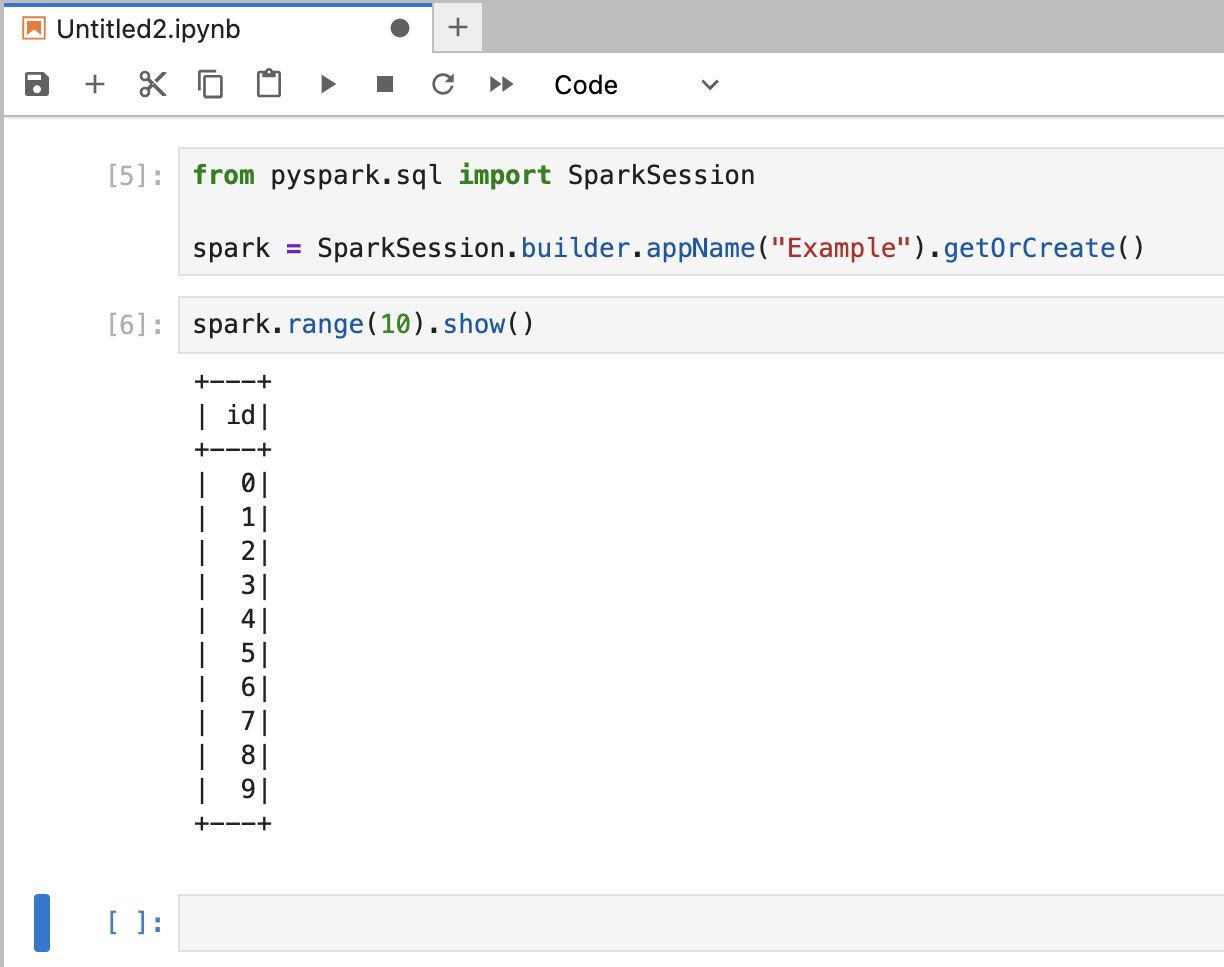
Start a Spark session in Jupyter Notebook
-
Enter the following code in a new notebook cell and run it using Shift + Enter
or Shift + Return on your keyboard.
-
Add a new cell and enter the following code to validate the session. Run it using
Shift + Enter or Shift + Return on your keyboard.
- The Java Virtual Machine (JVM)
- Hadoop and HDFS client libraries
- Py4J - Python and Java bridge
- Spark environment detection
- Cluster configurations, such as YARN, executors, or memory settings
Connect to Trino from Jupyter Notebook
You can run SQL queries against Trino directly from the same notebook. To do this, create a Trino Connection and execute a sample query such as the one in the following code.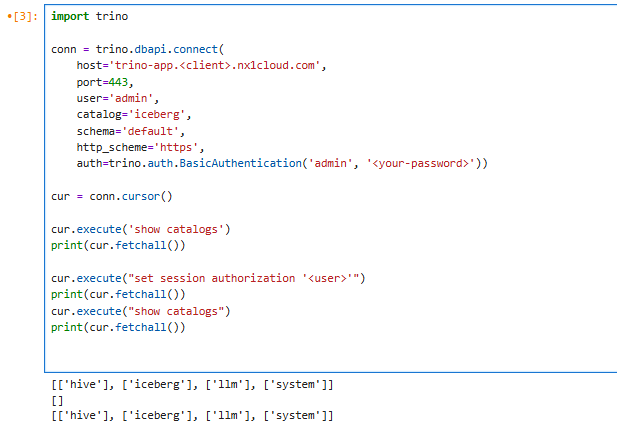
Run a Spark SQL command in Jupyter Notebook
You can use the notebook to explore Hive/Iceberg namespaces and run a Spark SQL command.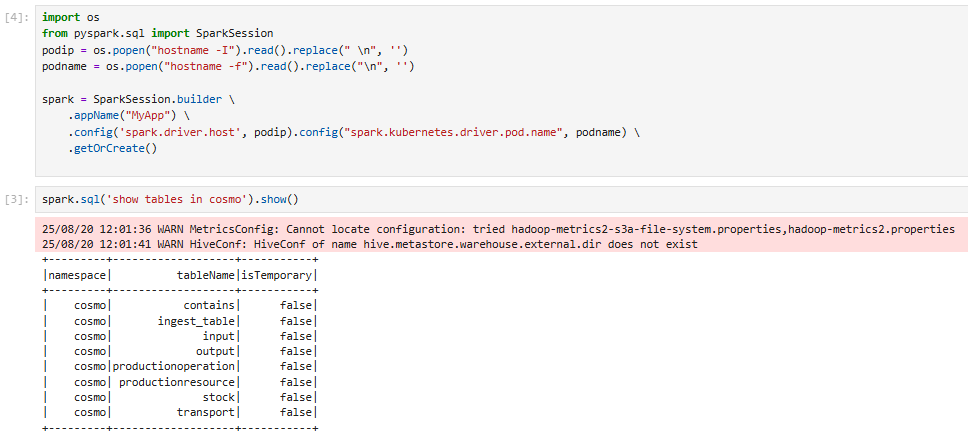
An output after running a Spark SQL command
Shared folders: utils and dags
In NexusOne, JupyterHub mounts two shared directories inside every user pod: utils and dags.
These folders support code reuse and Airflow integration across the platform.
utils/: A shared utility code
In NexusOne, the utils directory contains shared helper modules that you can import directly
into any notebook or PySpark job. It also provides the following benefits:
- Available as a mount in every Jupyter environment
- A central place for storing reusable Python utilities
- Standardized common logic across teams
- Automatic availability to all users and sessions
dags/: An Airflow DAG directory
In NexusOne, the dags folder is a live mount connected to an Airflow instance.
Any valid .py file placed here becomes an Airflow DAG automatically.
It provides the following benefits:
- Writes DAGs directly from Jupyter
- Automatic syncing of changes to the Airflow scheduler
- Enforcement of unique
dag_idvalues - Alignment with NexusOne naming conventions and validation rules
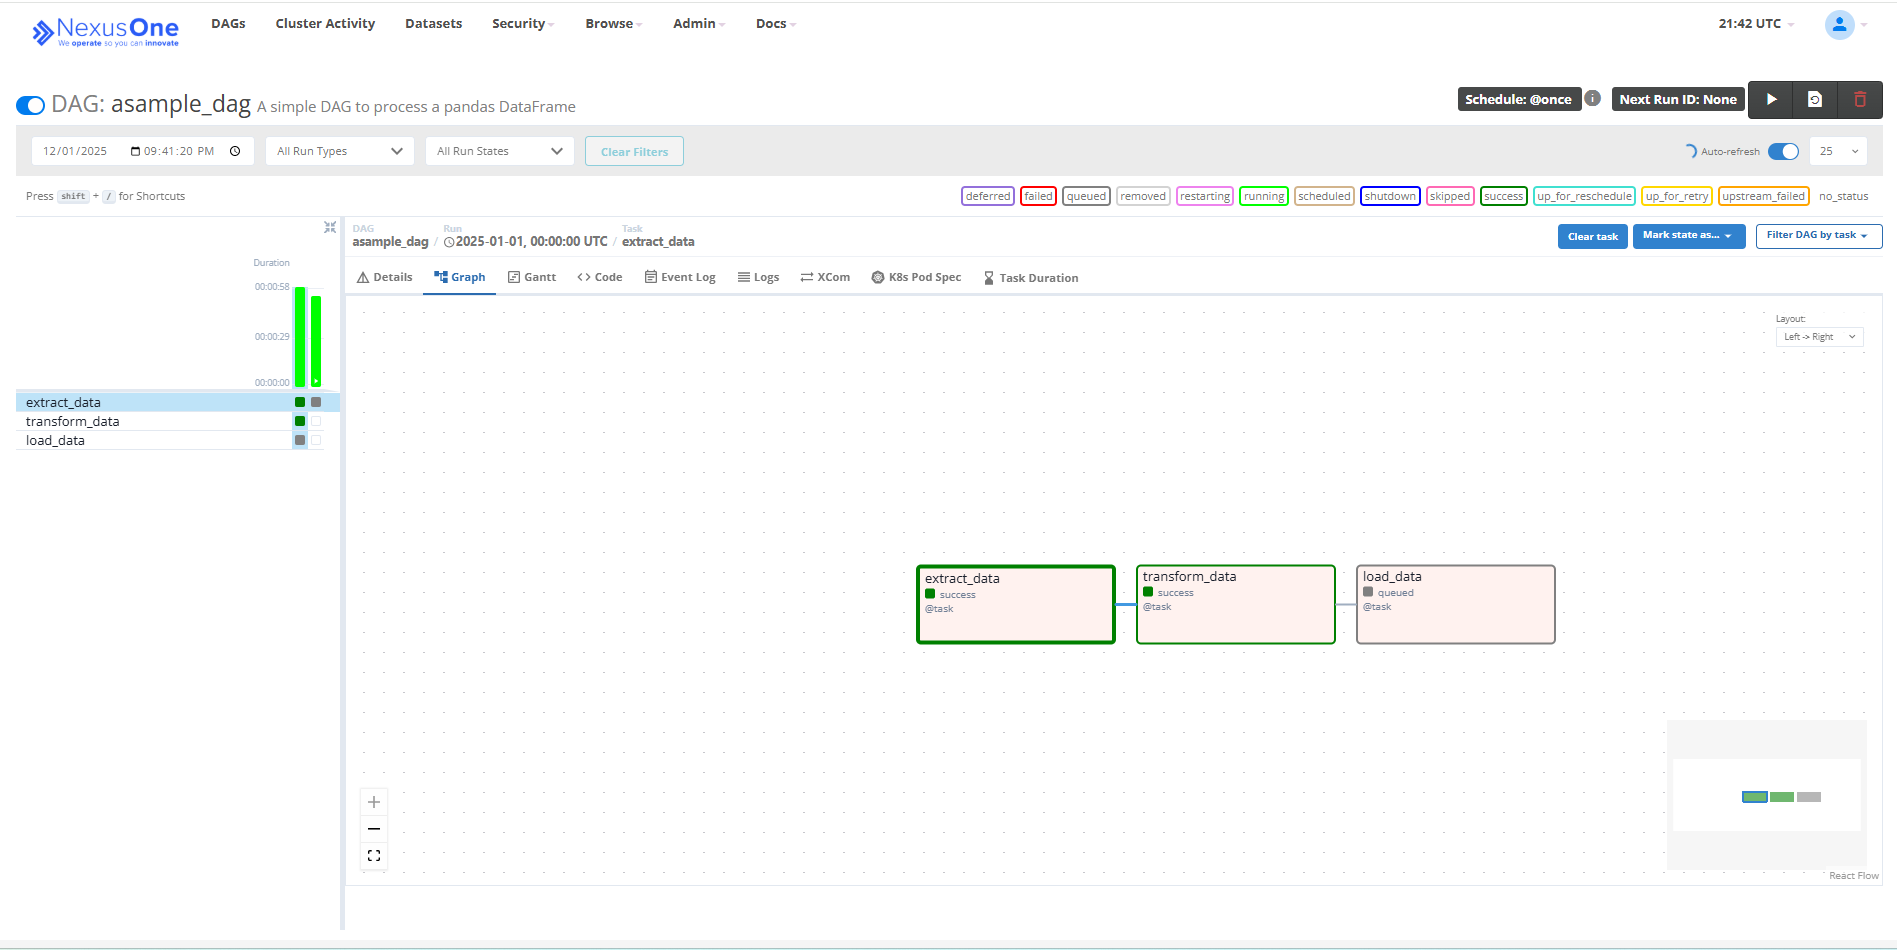
Executed DAG in Airflow
Keep DAG code clean, modular, and backed by helpers in utils/.
Additional resource
- To get an overview of JupyterHub, refer to the JupyterHub in NexusOne page.
- To learn about best practices when using JupyterHub, refer to the JupyterHub best practices for users page.
- For more details about JupyterHub, refer to the JupyterHub official documentation.